
Reactor 활용한 Notification 구축 POC

· 8 min read
Haekyu Cho
Software Engineer

팀내 공유 자료

배경

  • 최근 쇼핑몰 입점이 늘어나면서 쇼핑몰 어드민의 엑셀 다운로드 요청이 급증했고, 이로 인해 서버가 불안정해지는 문제가 발생
  • 이를 해결하기 위해 Kafka Consumer를 활용한 비동기 엑셀 생성 방식으로 전환한 결과 서버 장애 해소
  • 하지만 비동기 처리 특성상 고객이 다운로드 완료 시점을 즉시 알 수 없어, 고객 문의(CS)가 오히려 증가하는 새로운 문제가 발생
  • 약 30만의 회원 엑셀 다운로드시 약 8분이상 소요(DB SELECT -> Excel 전환 -> Zip압축+암호화)

요구사항 정리

  • 엑셀 다운로드 완료 알림
  • 다양한 알림 유형 지원
    • 주문발생, 클레임발생, 1:1문의, 상품승인, 상품문의, FDS 탐지
    • 어드민 모바일 푸시(FCM)
  • 대상별 알림 발송
    • 몰별 알림, 운영자별 알림, 전체 알림, 파트너 알림
  • 오프라인 지원 및 영속성
    • 클라이언트 미접속 시에도 알림 보관
    • Dooray Stream과 같은 타임라인 형태의 저장소 구성

전제조건

  • EDA 기반 구현 - 이벤트 발생 시 Message Broker를 통해 실시간으로 클라이언트에 메시지 전달
  • 도메인 간 결합도 최소화 - 각 도메인은 메시지 발행만 담당하며, Notification 시스템과의 커플링 방지
  • MSA 서비스 독립성 - 다른 MSA 서버들과 완전히 독립적으로 동작
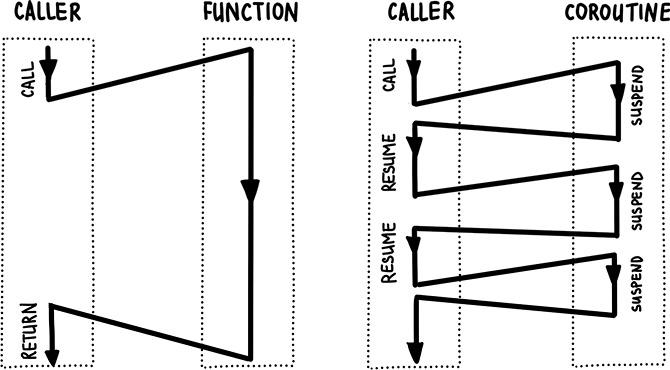
  • Reactive 프로그래밍 - 비동기 논블로킹 방식으로 구현
  • 독립적인 서비스 구성 - Spring Cloud Gateway를 거치지 않는 별도 도메인 서버 구성
  • 인증 및 캐싱 전략 - Admin 토큰/정보 기반 메시지 대상 구분, 로컬 캐시 적극 활용

사전조사

HTTP Polling

https://velog.velcdn.com/images%2Fhahan%2Fpost%2F78ff6d6b-b8f6-4a25-b942-b5b2e9063a2d%2Fimage.png

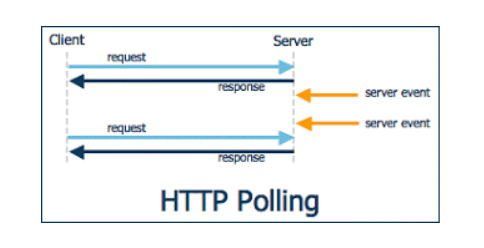
HTTP Polling은 클라이언트가 서버에 주기적으로 HTTP 요청을 보내서 새로운 데이터나 상태 변화를 확인하는 통신 방식

장점

  • 구현이 간단하고 직관적
  • 방화벽이나 프록시 환경에서도 잘 동작
  • HTTP 표준을 그대로 사용

단점

  • 폴링 주기가 짧으면 불필요한 네트워크 트래픽 발생
  • 폴링 주기가 길면 실시간이 아님
  • 서버 응답이 변하지 않으면 리소스 낭비

http 1.1에서는 keep-alive가 default이며 모든 요청이 connectionless는 아님

Long Polling

long polling

polling과 통신방법은 같으며 요청을 받은 서버는 메세지를 전달할수 있을 때까지(timeout될때까지) 무한정 커넥션을 종료하지 않고 메세지를 전달할수 있을때 응답을 준다.

장점

  • 항상 연결이 되어있어서 polling보다는 리소스 절약
  • 거의 실시간에 가깝다
  • HTTP 표준을 그대로 사용

단점

  • 데이터가 수시로 바뀔경우 polling보다 많은 리소스 낭비
  • 호출 주기가 없기 때문에 응답이 오면 다시 서버로 요청

Server-Sent Events (SSE)

SSE
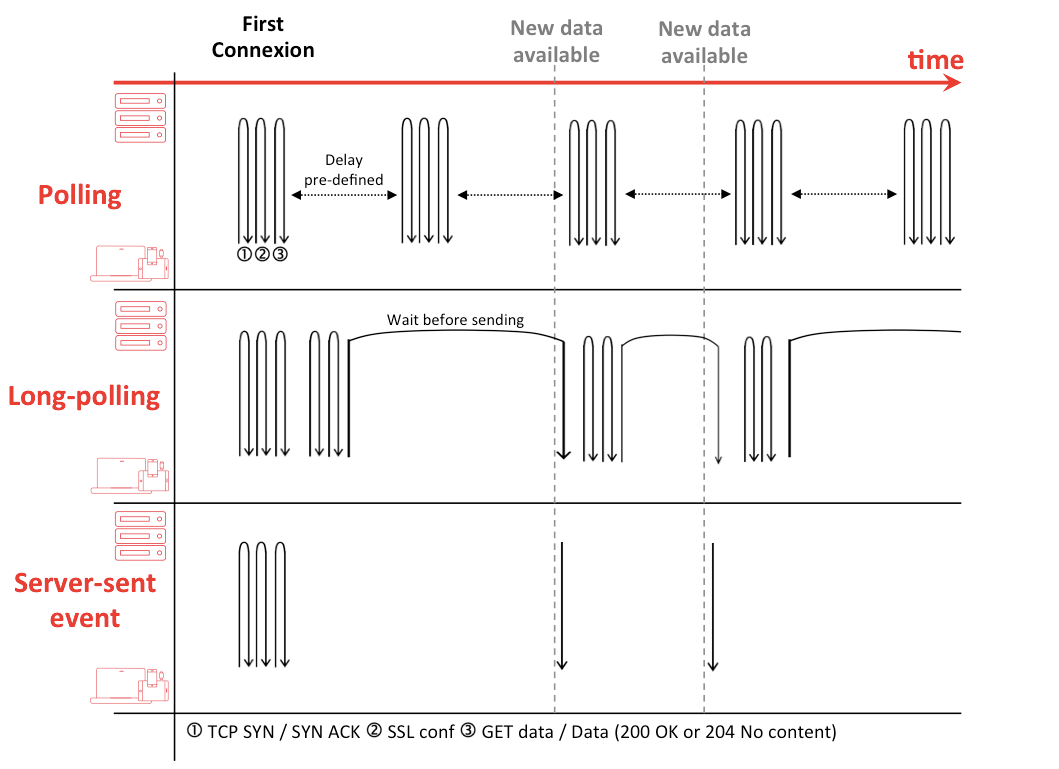
  • 클라이언트는 메세지를 구독하고 서버는 이벤트 발생시 클라이언트로 푸시한다. (서버 -> 클라 단방향)
  • response header의 content-type: text/event-stream이 추가되어야 하며 response body의 format은 아래와 같다.

response payload

# multiline data
data: first line\n
data: second line\n\n
# JSON Data
data: {\n
data: "msg": "hello world",\n
data: "id": 12345\n
data: }\n\n

JSON 젹렬화가 복잡해 보이지만 Spring의 Content Negotiation Strategies을 믿어보자.

장점

  • 통신 리소스 절약
  • 전통적인 HTTP를 이용하며 구현 심플

단점

  • XHLHttpRequest가 아닌 EventSource web api로 구현
  • 단방향 통신

https://developer.mozilla.org/ko/docs/Web/API/EventSource/EventSource

Websocket

WS
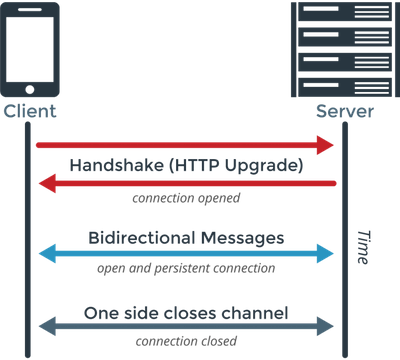
  • 2011년 표준화되었으며 양방향 통신
  • http://가 아닌 ws://프로토콜을 사용하며 80(ws://), 443(wss://)포트 사용
  • handshake는 위와 동일하게 http통신으로 이루어지며 handshake수립후에는 ws로 양방향 통신한다

장점

  • 웹표준이며 SSE보다 브라우저 호환성이 더 좋다.
  • 양방향이다.

단점

  • 서버와 클라이언트 모두 receive와 send를 구현해야 하며 전통적인 웹개발 방식으로는 구현이 어렵다.

https://developer.mozilla.org/ko/docs/Web/API/WebSocket

구현

repo : https://github.com/chk386/notifications

기술스택

  • language : kotlin
  • reactor, coroutine, reactive kafka, webflux functional endpoint
  • message broker : kafka
  • framework : springboot 2.4.4
  • client : ES6, vanillaJS, EventSource, Websocket
  • container : docker-compose (zookeeper, kafka, kafka-ui)
  • build tool : gradle kotlin DSL
  • dockerizing : spring boot maven plugin (bootBuildImage)

핵심 키워드 : hot

cold publisher

Mono/Flux는 subscribe하지 않으면 아무일도 일어나지 않는다. 대부분 webflux에서 subscribe를 대신 처리하고 있다.

hot publisher

subscribe 하기전 데이터를 생성할 수 있고 N개의 subscriber가 존재할수 있다. Notification 서버가 최초 기동할때 hot publisher를 메모리에 올려두고 SSE, Websocket 요청시 hot publisher를 구독하여 서버 이벤트를 클라이언트로 푸시할수 있다.

Sinks

reactor 3.4.0 이전에는 FluxProcessor, MonoProcessor, UnicastProcessor등을 이용하였으나 deprecated

The Sinks categories are:
1. many().multicast(): a sink that will transmit only newly pushed data to its subscribers, honoring their backpressure (newly pushed as in "after the subscriber’s subscription").
2. many().unicast(): same as above, with the twist that data pushed before the first subscriber registers is buffered.
3. many().replay(): a sink that will replay a specified history size of pushed data to new subscribers then continue pushing new data live.
4. one(): a sink that will play a single element to its subscribers
5. empty(): a sink that will play a terminal signal only to its subscribers (error or complete), but can still be viewed as a Mono<T> (notice the generic type <T>).
Processors and Sinks

Sinks.Many< T >.multicast().onBackpressureBuffer()

multicast

Sinks.many().multicast().onBackpressureBuffer()
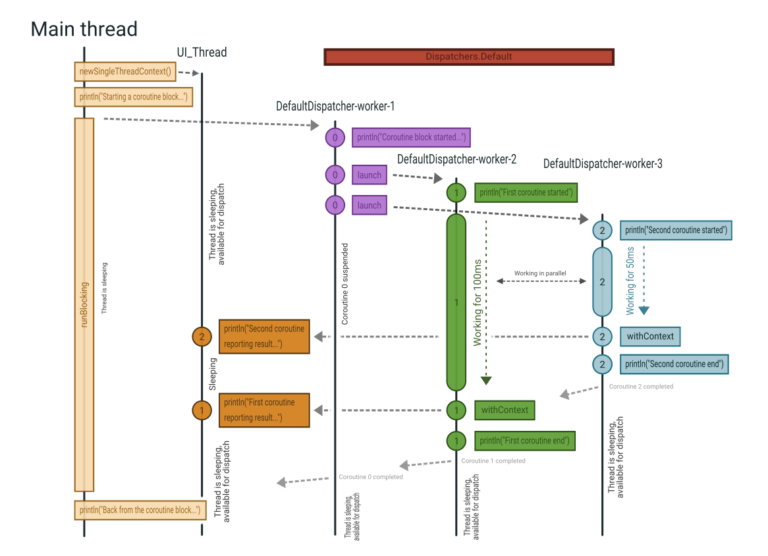
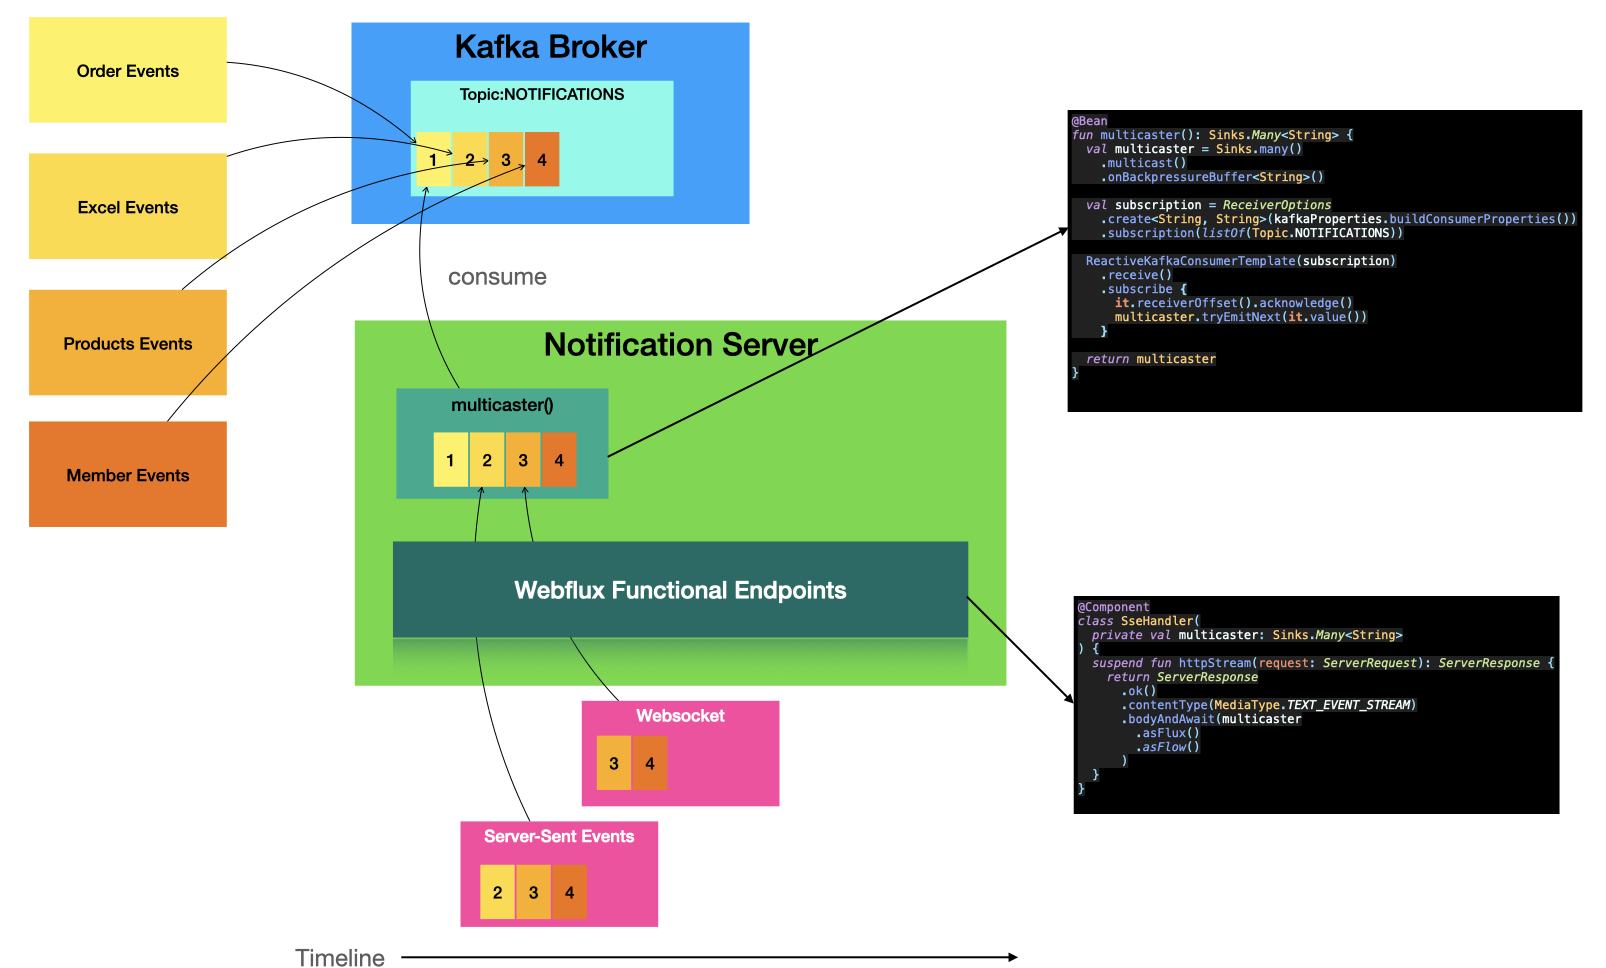
시스템 구성

구성도

코드

// 메인 클래스
@SpringBootApplication
@EnableWebFlux
class NotificationsApplication {

@Bean
fun coRoute(sseHandler: SseHandler): RouterFunction<ServerResponse> {
return coRouter {
GET("/notifications", sseHandler::httpStream)
GET("/produce", sseHandler::produce)
}
}

/**
* @see <a href="https://docs.spring.io/spring-framework/docs/current/reference/html/web-reactive.html#webflux-websocket-server-handler">참고</a>
*/
@Bean
fun handlerMapping(websocketHandler: WebsocketHandler, sampleHandler: SampleHandler): HandlerMapping {
val map = mapOf(
"/ws" to websocketHandler, "/ws2" to sampleHandler
)
val order = -1 // before annotated controllers

return SimpleUrlHandlerMapping(map, order)
}

@Bean
fun handlerAdapter() = WebSocketHandlerAdapter()

@Bean
@Profile("default")
fun run(producer: ReactiveKafkaProducerTemplate<String, String>): ApplicationRunner {
return ApplicationRunner {
while (true) {
println("메세지를 입력해주세요.")
producer.send(Topic.NOTIFICATIONS, GenericMessage(readLine()!!)).subscribe()
}
}
}
}
  1. 웹소켓 핸들러를 router에 등록, 엔드포인트는 "/ws", "/ws2"로 등록
  2. 테스트 용으로 터미널에서 표준 입력(키보드)시 카프카로 토픽 전송 (메세지 전파)
// 웹소켓 핸들러 구현
@Component
class WebsocketHandler(
private val producer: ReactiveKafkaProducerTemplate<String, String>,
private val multicaster: Sinks.Many<String>
) : WebSocketHandler {

override fun handle(session: WebSocketSession): Mono<Void> {
val input = session
.receive()
.doOnNext {
producer.send(Topic.NOTIFICATIONS, it.payloadAsText).subscribe()
}.then()

val output = session
.send(multicaster
.asFlux()
.filter { it.contains("all:") || it.startsWith(getId(session.handshakeInfo.uri)) }
.map(session::textMessage)
)

return Mono.zip(input, output).then()
}

private fun getId(uri: URI): String {
return UriComponentsBuilder
.fromUri(uri)
.build()
.queryParams["id"].orEmpty()[0]
}
}
  1. WebSocketHandler를 상속받아 handle 구현
  2. 웹소켓은 양방향 통신이기 때문에 input, output을 정의해야 한다.
  3. input에서는 전달 받은 payload text를 카프카 토픽으로 발행 한다.
  4. output에서는 kafka에서 받은 메세지들을 flux로 변환 후 구독자에게 메세지를 브로드 캐스트한다.
// kafka config
@Configuration
@EnableKafka
class KafkaConfiguration(private val kafkaProperties: KafkaProperties) {

@Bean
fun multicaster(): Sinks.Many<String> {
val multicaster = Sinks.many()
.multicast()
.onBackpressureBuffer<String>()

multicaster.asFlux()
.subscribe { println("consumer -> Sinks.many().multicast() => $it") }

consume(multicaster)

return multicaster
}

@Bean
fun produce(): ReactiveKafkaProducerTemplate<String, String> {
return ReactiveKafkaProducerTemplate(
SenderOptions.create(
kafkaProperties.buildProducerProperties()
)
)
}

private fun consume(multicaster: Sinks.Many<String>) {
ReactiveKafkaConsumerTemplate(
ReceiverOptions
.create<String, String>(kafkaProperties.buildConsumerProperties())
.subscription(listOf(Topic.NOTIFICATIONS))
)
.receive()
.doOnNext { it.receiverOffset().acknowledge() }
.subscribe { multicaster.tryEmitNext(extractMessage(it)) }
}

private fun extractMessage(it: ReceiverRecord<String, String>) =
if (it.value().contains(":")) {
it.value()
} else {
"all:${it.value()}"
}
}

object Topic {
const val NOTIFICATIONS = "BACKOFFICE-NOTIFICATIONS"
}
  • 메세지 전달(토픽 발생)과 메세지 컨슘(메세지를 multicaster에게 전달)

local

  1. git clone https://github.com/chk386/notifications
  2. docker-compose up
    1. localhost:8081 : kafka UI
    2. localhost:9092 : broker
    3. localhost:2181 : zookeeper
  3. gradle boot run (또는 idea에서 NotificationsApplication.kt 실행

nhn cloud

  1. dockerizing
gradle bootBuildImage --imageName=shopby-notification
docker login # docker hub 계정입력
docker tag shopby-notification ${본인의 dockerhub ID}/notification
docker image push ${본인의 dockerhub ID}/notification
  1. docker
# 인스턴스에 ssh 서버접속 후 실행
docker-compose -f docker-compose-nhncloud.yml up
docker run -d -e "SPRING_PROFILES_ACTIVE=cloud" -p 8080:8080 chk386/notification

# 카프카 토픽 & 메세지 생성시
docker exec -it kafka /bin/bsh

# 토픽생성
/bin/kafka-topics --create --topic BACKOFFICE-NOTIFICATIONS --bootstrap-server localhost:9092
# 토픽정보
/bin/kafka-topics --describe --topic BACKOFFICE-NOTIFICATIONS --bootstrap-server localhost:9092
# procude
/bin/kafka-console-producer --topic BACKOFFICE-NOTIFICATIONS --bootstrap-server localhost:9092
# consumer
/bin/kafka-console-consumer --topic BACKOFFICE-NOTIFICATIONS --bootstrap-server localhost:9092
# 토픽 삭제
/bin/kafka-topics --delete --topic BACKOFFICE-NOTIFICATIONS --bootstrap-server localhost:9092
  1. 데모 페이지
    1. http://localhost:8080/sse.html
    2. http://localhost:8080/websocket.html

생각해봐야 할 것들

  • 유실을 허용한다면 redis pub/sub도 괜찮은 방법인듯 하다
  • 현재 백오피스 고객이 2000을 넘지 않기에 Notification서버 1대로 운영이 충분히 가능
  • 만약 동접이 더 많아지면 웹소켓 서버를 여러대 두어 라우팅 전략 짜야함
  • reactive 드라이버를 지원하는 mongoDB의 change stream기능도 고려해볼 필요가 있다. 실시간성과 영속성을 모두 만족 링크
  • 앱 서드 파티 개발사에 notification api 개방

참고자료

Coroutine

· 11 min read
Haekyu Cho
Software Engineer
  • Co + Routine
    • Co : 협력
    • Routine : 함수
  • 즉 서로 협력하는 함수
    • 협력한다 라는 의미는 함수의 블록이 끝나지 않아도 중간에 빠져나와 다른 함수들과 협력할수있다 라는 의미 (아래 예시에서 설명)
  • 비선점 멀티테스킹
  • 경량 스레드
    • 같은 스레드에서 실행되는 코루틴들은 협력적 멀티태스킹을 사용하여 실행을 양보(suspend), 재개(resume) 하는 매커니즘. OS가 개입하지 않고 코루틴 런타임이 직접 관리 하기 때문에 context switching 오버헤드가 없음
  • 일반적인 함수는 종료될때까지 함수 블럭을 못벗어나지만 코루틴은 일시중단하고 블럭을 벗어나 다른 작업을 비동기적으로 수행

caller-coroutine

같은 scope내에서 비동기적인 실행 (= caller) 코드로 예시를 들면

@Test
fun `코루틴`() {
runBlocking {
launch {
delay(1000L)
println("World!")
}
println("Hello,")
}
}
//결과
Hello, World!

co1


코루틴은 중간에 빠져나올수있는 협력 함수이다.

  • runBlocking : 코루틴 Scope은 만들고 내부의 코드가 다 동작할때까지 해당 thread를 blocking
  • runBlocking 으로 감싸여진 launch{}println("Hello, ") 는 같은 scope에 있다.
  • launch로 생성된 코루틴은 비동기 실행이 가능
    • launch가 실행되고 내부에서delay(1000L)가 걸리면 코루틴이므로 해당 블록을 빠져나와 println("Hello, ")를 실행한다.
    • 이후 1000ms 가 지나면 println("World!") 를 실행한다.

-> 코루틴인 launch{} 는 블록이 실행 중에도 같은 스코프 내에서 다른것들과 협력한다!

코루틴의 구성 요소

코루틴은 기본적으로 세가지로 구성되어있다.

  • coroutineScope
  • coroutineContext
  • Builder

CoroutineScope

  • CoroutineScope, GlobalScope , ..
  • 말 그대로 코루틴의 범위이다.
  • 같은 scope 내의 코루틴들이 비동기적으로 동작한다.
  • 코루틴은 코루틴 스코프안에서만 동작한다.

CoroutineContext

  • Dispatcher.IO, Dispatcher.Main, Dispatcher.Default, ...
  • 코루틴을 실행하는 특정 환경
  • 주요 요소는 jobDispatcher
    • job : 코루틴을 제어하기위한것 (코루틴의 시작, 종료, 합치기 등등)
    • Dispatcher : 코루틴과 스레드의 연관을 제어
  • Dispatcher를 코루틴이 동작하는 Thread 나 Thread Pool 이라 이해했다.
    • ( Dispatcher 에 대한 자세한 설명은 아래에서 할 예정 )

CoroutineBuilder

  • async, launch, runBlocking
  • 코루틴 빌더는 스코프에서 실행할 코루틴을 생성하는 역할이다.
    • CoroutineScope에서 코루틴이 생성되어야만 비동기적인 동작을 한다.
    • scope를 생성했어도 builder를 통해 코루틴을 생성하지않았다면 비동기적인 동작은 하지않는다.

(1) launch

  • 결과 반환이 없는 단순 작업, Job 리턴

(2) Async

  • 결과 반환이 필요한 작업, Deferred<T> 반환
    • Deferred는 미래에 올수있는 값을 담아놓는 객체
    • Deferred 의 await() 메서드가 수행되면 코루틴의 결과가 반환되기까지 기다림
    • 이것을 코루틴이 일시중단 되었다고 함

(3) runBlocking

  • 코루틴 빌더 이지만 앞의 두개와는 조금 다름
  • 새로운 코루틴을 생성하고, 생성된 코루틴이 완료될때까지 현재 스레드를 차단한다.
  • 메인 함수나 테스트 함수에서 사용할것을 권장한다. (일반 함수에서는 suspend를 호출하기위한 용도)
  • 중요한 점은 runBlocking현재의 스레드를 점유한다라는것이다.

co2

  • 세 구성요소의 포함관계는 그림과 같다.
  • 위의 이미지 처럼 builder를 사용할때는 scope와 context를 명시해야한다.
    • CoroutineScope(Dispatchers.IO).launch { }  이런식으로 사용
    • 하지만 이미 생성된 scope 내에서는 launch { } 이렇게 더 많이 사용한다.
      • 명시를 하지않으면 현재의 context와 scope를 이어받기때문

세가지 기본 구성에 추가로 dispatchersuspend fun, withContext에 대해 설명

Dispatcher

  • coroutineContext의 일부
  • 코루틴 실행시 사용할스레드를 제어하는 역할

종류는 기본적으로 네가지가 있다.

#### Dispatcher.Default

  • IO dispatcher와 스레드 풀을 공유한다.
    • 백그라운드 스레드에서 작동
  • 크기는 기본값으로 CPU 코어 수 만큼 스레드를 생성한다. (최소 2개)
  • CPU 작업을 필요로하는 무거운 작업에 적합
    • 그 이유는 코어수 만큼 스레드를 생성하기때문에 CPU를 많이 점유하는 작업에서 최대 효율을 낸다
  • 내 컴퓨터 코어수 확인
sysctl -n hw.ncpu
# 결과
8
  • 아래의 코드로 default 스레드풀의 스레드를 출력하면 코어개수와 동일한것을 볼수있다.
repeat(50) {
CoroutineScope(Dispatchers.Default).launch {         
println(Thread.currentThread().name)
 }
}```

#### `Dispatcher.IO`

- **Default Dispatcher와 스레드풀을 공유**
- 필요에 따라 스레드를 더 생성하거나 줄일수 있다. (최대 64)
- 이름에 맞게 주로 **DB, 네트워크, 파일 관련 작업에 적합**
- 위의 방법과 동일하게 thread를 출력해보면 **core의 개수보다 많은것**을 확인할수있다.
- 그 이유는 대기시간이 긴 네트워크 작업의 경우 **더 많은 스레드를 이용해 병렬처리**하는것이 더 효율적이기 때문이다.

#### 프로젝트에 적용시에는 기본적으로 제공하는 Dispatcher를 사용하기보다 각 기능에 맞는 Dispatcher를 생성해 사용하는것이 좋다.

예시)

![co3](/img/wiki/co3.png

#### suspend fun

- 일시 중단이 가능한 함수
- 원하는 지점에서 중단후, 나중에 다시 실행을 진행할 수 있다.
- suspend 함수는 무조건 중단 되는게 아닌 **중단점을 만나야 중단**이 된다. (ex. delay(), WebClient 통신시..)
- suspend fun 만으로는 비동기 처리 X
- suspend fun은 코루틴 내부에 있어야하고, 그 코루틴은 해당 스코프에서 비동기 처리를함
- 비동기에서 중요한점은 **해당 스코프에서 코루틴을 생성**해야한다는 것이다.
- coroutine의 suspend 함수는 thread를 block 하지않는다.

<br/>
헷갈렸던 부분을 예시로 들어보면
<br/>
``` kotlin
@Test
fun `동기`() {
runBlocking {
val time = measureTimeMillis {
val one = first()
println("between")
val two = second()
println("the answer is ${one + two}")
}
println("Completed in $time ms")
}
}
suspend fun first(): Int {
println("first")
delay(1000L)
println("first end")
return 13
}
suspend fun second(): Int {
println("second")
delay(1000L)
println("second end")
return 29
}

나의 착각

  • 처음에는 위 예시를 실행하면 first()와 second()가 비동기 처리되어 결과가 1초가 나올줄알았다.
    • 그렇게 생각한 이유는 당시에는 코루틴(runBlocking)에서 suspend fun 을 호출하므로 비동기적으로 실행될것으로 착각했다.
    • 하지만 해당 코드에서 코루틴은 전체를 감싸는 runBlocking 밖에 없다.
      • 비동기적으로 실행 되려면 같은 스코프에 명령어들과 코루틴이 있어야한다.
      • 그러므로 delay 만큼 기다리고 아래의 코드를 순차적으로 진행하게 된다.
  • 위의 코드는 그냥 순차적으로 출력된다.

실제 결과

first
first end
between
second
second end
the answer is 42
Completed in 2021 ms //비동기 처리 안됨

first() 나 second()를 비동기 방식인 WebClient를 사용하는 suspend fun 이라고 가정한다면 

**코루틴을 생성하지않고 위와같은 방식으로 사용시 비동기 동작이 안된다는것을 알수있다. **

비동기 코드로 변경

  • 위에서 설명했다시피 비동기를 이용하기위해서는 같은 스코프에서 코루틴을 생성 했을 때 비동기 실행을 한다.
    • 그러기 위해서는 first() 와 second()를 각각 async로 묶는다.
  • 아래 코드를 보면 runBlocking 이 만든 스코프에 async { first() }, println("between")async { second() } 가 있고
    • aync 로 만들어진 코루틴은 협력하는 함수 이므로 특정 시점(delay)에 일시정지를 하고 코루틴을 빠져나와 같은 스코프의 다른 함수들과 협력할수있다.
@Test
fun `비동기`() {
runBlocking {
val time = System.currentTimeMillis()
val one = async { first() }
println("between")
val two = async { second() }
println("the answer is ${one.await() + two.await()}")

println("Completed in ${System.currentTimeMillis() - time} ms")
}
}

suspend fun first(): Int {
println("first")
delay(1000L)
println("first end")
return 13
}
suspend fun second(): Int {
println("second")
delay(1000L)
println("second end")
return 29
}
between
first
second
first end
second end
the answer is 42
Completed in 1018 ms // 비동기 처리

그림으로 나타내보면 아래와 같다. co4

  • 출력 결과는 그림의 파란색 글씨 순서대로 출력된다.
  • 마름모는 코루틴이 생성되었다는것을 의미
  • 코틀린은 총 runBlocking, async, async 총 세개가 생성됨
  • first()와 second() 는 각각 async로 만든 코루틴 내부에 생기기 때문에 비동기 처리가 가능하다.
    • println("first") 보다 println("between") 이 먼저 출력된것은 async를 call 하기 때문이다.
  • 비동기 처리로 인해 소요시간은 1000ms를 조금 넘는다.
  • 비동기 세상에서는 가장 긴 실행시간이 전체 수행 시간이다!

6) withContext

  • 코루틴 빌더가 아니기때문에 코루틴을 생성하지않음
  • suspend fun 이기때문에 코루틴, suspend fun 내부에서 사용되어야함
  • withContext는 블록의 마지막 줄 값을 반환한다.
  • withContext의 블록이 끝나기전까지 해당 코루틴은 일시정지
    • 순차적으로 코드가 실행되는것을 구현할 수 있다.
  • 코루틴의 실행환경을 다른 컨텍스트로 전환하는 역할
    • 코루틴이 실행되는 스레드를 변경한다 라고 이해하면된다.
    • coroutineScope와의 차이점은 withContext는 컨텍스트를 전달할수있다.
      • coroutineScope ≡ withContext(this.coroutineContext)

사용 사례

주문 도메인에서 사용하고 있는transactionTemplate.executeWithContext {}를 살펴보자 이것은 withContext이므로 코루틴 빌더가 아니다. (처음엔 이것도 코루틴 빌더라 착각했다.) 트랜잭션을 만들고 그 동작을 설정한 context에서 한다 라는 의미이다.

실제로 구현된 코드를 보면 co5

  • withContext 선언 후 execute 하는 것을 볼수있다.
  • context는 boundedElasticDispatcher를 사용
    • boundedElasticDispatcher는 Shedulers의 boundedElastic을 코루틴에서 사용하기위해 변환한 디스패처이다.
    • co6
  • boundedElastic()
    • 블로킹 IO 태스크와 같은 생명주기가 긴 태스크에 적합하다.
    • 제한된 수의 worker를 동적으로 생성하여 worker를 재사용하는 스케줄러이다.

예시

첫 학습 시 코루틴에 대해 확실히 이해하기 어려웠는데 아래 자료를 많이 참고함 https://silica.io/understanding-kotlin-coroutines/5/

싱글 스레드에서의 비동기 실행

코루틴을 이해하기 위해 먼저 멀티 스레드가 아닌 단일 스레드에서 진행하면서 코루틴을 이해하고 이후 예시에서 멀티 스레드를 다루겠다.

(현재 스레드 의 출력하는 부분은 코드상 생략) co7

  • 결과값을 보면 아래와 같은 순서로 출력
[Test worker]                Starting a coroutine block...    // [Thread 종류 @코루틴번호] 출력,
[Test worker @coroutine#1] Coroutine block started          // 현재는 싱글 스레드에서 실행하므로 test worker에서만 실행
[Test worker @coroutine#1] Two coroutines have been launched
[Test worker @coroutine#2]  1/ First coroutine start
[Test worker @coroutine#3]  2/ Second coroutine start
[Test worker @coroutine#3]  2/ Second coroutine end
[Test worker @coroutine#2]  1/ First coroutine end
[Test worker]               Back from the coroutine block

'Two coroutine have been launched' 가 1/  First2/ Second 보다 왜 먼저 출력될까?


sshot

  • 이전 코루틴 개념에서 설명했던것과 동일
  • launch로 코루틴을 생성하고 바로 내부를 들어가는게 아닌 launch를 call을 한다.
    • 그렇기때문에 가장 마지막에있던 println("Two coroutines have been launched") 가 먼저 실행된것
  • 코루틴의 동시성은 같은 스코프끼리 비동기적으로 동작한다. (너무 많이 반복하는것같지만 가장 중요하다 생각)

비선점 멀티테스킹

  • 코루틴의 동시성은 비선점 방식이다.
    • 선점 :  기존의 Task가 실행중에 있어도 스케줄러가 강제 중지하고 다른 Task를 실행할수있음
    • 비선점 : 기존의 Task가 종료될때까지 계속 실행을 보장한다.
  • 하나의 작업이 스레드를 Blocking 하면 비선점 방식이므로 제어권을 가져올수없음
  • 코루틴은 동시성은 제공하지만 병렬성은 제공하지않는다.
    • 코루틴은 하나의 스레드에서 동작하기때문이다.

(추가) 동시성 vs 병렬성

co8

  • 동시성 : 싱글 코어에서 멀티 스레드를 번갈아가며 동작하는 방식, 동시에 실행되는것 같이 보인다.
    • 동시성을 지원하는 경우, 하나의 코어에서 여러 스레드를 변경해가며 실행하므로  context switching 발생
  • 병렬성 : 멀티 코어에서 멀티스레드를 동작하는 방식, 실제로 동시에 실행이됨

코드 예시     co9 결과

First coroutine start, suspend for 50ms
Second coroutine start, suspend for 100ms
First coroutine : starting some computation for 100ms
Computation ended
Second coroutine end after 160ms // 100ms 가 아닌 160ms 가 소요됨

co11

  • 코루틴이 비선점형 멀티태스킹이라는것을 보여주는 예시
  • 첫번째 코루틴에서 Thread.sleep(100) 으로 스레드를 독점함 (delay와 달리 thread가 blocking된다.)
    • 원래 두번째 코루틴은 100ms 만 delay 해야하지만 스레드 자체가 blocking 되어 실제로 150ms 소요
  • 즉 코루틴에 Blocking 작업은 비효율적이다.
  • 단일 스레드에서 코루틴은 Webclient 같은 non-Blocking 작업에 효과적이지만,  Blocking 방식의 RDBMS 작업은 효과적이지 않다 라는 결론.

"그렇다면 우리는 Blocking 방식으로 동작하는 RDBMS(JPA)나 FeignClient 등을 사용할때는 코루틴 사용을 하면 안될까?"

멀티 스레딩 방식의 코루틴을 사용 해야한다.

멀티 스레딩

  • 코루틴의 동시성멀티 스레딩의 개념이 섞여서 어려웠다.
  • 싱글 스레드 에서의 코루틴 동시성과 헷갈리면 안된다.
  • 코루틴에서는 다른 스레드로 이동하는것이 굉장히 쉬움
  • 위의 개념설명에서 보았던 Dispatcher를 이용하면 스레드를 변경할수있다.

코드 예시 co12

  • Dispatchers.Default :  Default worker 스레드풀을 사용한다.
    • 이전에는 Test 코드의 메인 스레드인 Test worker만을 사용해 단일 스레드로 비동기 처리를 했음
================== 첫번째 ==================
[Test worker]                                 #0 Starting a coroutine block
[DefaultDispatcher-worker-1 @coroutine#1]     #0 Coroutine block started
[DefaultDispatcher-worker-2 @coroutine#2]     #0 First coroutine started
[DefaultDispatcher-worker-3 @coroutine#3]     #0 Second coroutine started
[DefaultDispatcher-worker-3 @coroutine#3]     #0 Second coroutine end
[DefaultDispatcher-worker-2 @coroutine#2]     #0 First coroutine end
[Test worker]                                 #0 Back from the coroutine block in thread [Test worker] after 133ms // 150ms 보다 작음
================== 두번째 ==================
[Test worker]                                 #1 Starting a coroutine block
[DefaultDispatcher-worker-2 @coroutine#4]     #1 Coroutine block started
[DefaultDispatcher-worker-2 @coroutine#6] #1 Second coroutine started
[DefaultDispatcher-worker-1 @coroutine#5]     #1 First coroutine started
[DefaultDispatcher-worker-2 @coroutine#6]     #1 Second coroutine end
[DefaultDispatcher-worker-1 @coroutine#5]     #1 First coroutine end
[Test worker]                                 #1 Back from the coroutine block in thread [Test worker] after 106ms // 150ms 보다 작음

co13

  • Thread.sleep을 총 100 + 50 = 150ms 를 했지만 실제 결과들은 그것보다 짧음
    • 그 이유는 DefaultDispatcher를 이용해 다른 스레드들(worker-2, worker-3)에서 각각 100ms, 50ms 작업을 했기때문이다.
  • 같은 작업을 했지만 첫번째(133ms) 보다 두번째(106ms) 가 더 빠른 이유는 첫 실행시 defaultDispatcher-worker 스레드 풀을 생성 비용 때문
  • 주의 해야할점은 여러 스레드에서 동작을 시키므로 동시성 문제를 신경써야한다.
    • 코루틴은 동시성문제에 대해서는 보장하지않음

컨텍스트 스위칭

  • 멀티스레드의 동시성 문제 : 여러 스레드가 동시에 동일한 리소스에 접근할때 생기는 문제
    • 해결법은 모든 리소스를 단일 스레드에서만 접근할 수 있게한다.

코드 예제 co14 결과

[Test worker]                               Starting a coroutine block
[DefaultDispatcher-worker-1 @coroutine#1]  Coroutine block

[DefaultDispatcher-worker-2 @coroutine#2]   First coroutine started
[DefaultDispatcher-worker-3 @coroutine#3]   Second coroutine started in thread
[DefaultDispatcher-worker-3 @coroutine#3]   Second coroutine end
[AccessThread @coroutine#4]                 Second coroutine reporting result=13 in Access Thread
[DefaultDispatcher-worker-2 @coroutine#2]   First coroutine end
[AccessThread @coroutine#5]                First coroutine reporting result=29 in Access Thread

[Test worker]                               Back from the coroutine block

exam5

  • accessContext 라는 하나의 스레드에서 리소스에 접근한다.
  • 새로운 스레드를 생성하려면 newSingleThreadContext() 만 사용하면된다.
  • 만약 "First coroutine end" 보다 "First coroutine reporting result = ~ " 를 더 빨리 출력하기 원하면 withContext를 사용하면 된다.
    • withContext는 순차적인 실행을 보장한다.
    • launch(accessContext) => withContext(accessContext)
    • co15

미묘한 차이점

runBlocking과 coroutinScope의 차이

  • https://www.baeldung.com/kotlin/coroutines-runblocking-coroutinescope
  • 요약
    • coroutineScope
      • 스레드를 블로킹하지 않음
      • suspend 함수 내에서만 호출 가능
      • 코루틴 범위 밖에서 호출 불가능
      • launch로 job을 반환 받아 코루틴 취소가 가능
    • runBlocking
      • 일시중단 불가능
      • 현재 스레드 차단
      • 메인메소드, 테스트 코드 와같이 기존 코루틴 범위 외부에서 코루틴 시작시 사용
      • launch로 job을 반환 받아도 코루틴 취소가 안된다.

CoroutineScope와 coroutinScope 차이

Coroutine Diagram

직접 그려본 다이어그램 diagram

마무리

  • DB 통신이던 network 통신이던 한 scope에서 여러번 호출이 필요하다면 코루틴을 통한 비동기 통신은 효과적
  • JPA는 Blocking 방식이므로 dispatcher를 이용해 멀티스레딩 방식으로 사용
    • 단 멀티스레딩에대한 동시성 문제는 신경써야함

캐시 기초 & 전략

· 5 min read
Haekyu Cho
Software Engineer

Hierarchy of Computer Memory

Imgur

CPU Cache & Memory

https://i.imgur.com/NkjAkVR.png

System Bus

https://i.imgur.com/dDrrDX1.png

Size & Latency

https://i.imgur.com/PdFEMLW.png

Cache

  • 컴퓨팅에서 성능 향상을 위한 핵심 개념
  • 자주 사용되는 데이터나 계산 결과를 빠른 저장소에 보관해 두었다가, 같은 데이터가 다시 필요할 때 원본 소스에서 가져오는 대신 캐시에서 빠르게 제공하는 방식으로 작동

Cache Memory

속도가 빠른 장치와 느린 장치 사이에서 속도 차에 따른 병목 현상을 줄이기 위한 범용 메모리 CPU는 L1~L3 캐시 메모리가 있으며 L은 Level을 뜻함 1차에 없으면 2차, 2차에 없으면 3차, 3차에 없으면 Main Memory cpu 벤더마다 구조가 상이함

Apple M2 Pro Cpu

  • L2캐시가 코어에 있거나 여러개의 코어가 공유할수 있음
  • L3는 프로세서 안에 넣지 않는 경향. 없거나 또는 메인보드에 있을수 있음

Pareto Principle (파레토 원칙))

https://i.imgur.com/s3ViV7I.png

Cache Coherence (캐시 일관성)

캐시가 갱신 되었다면(또는 삭제) 나머지 캐쉬에 전달하여 일관 유지해야함 멀티 프로세서에서 읽기 보다 쓰기가 어려운 문제

Locality of reference (참조 지역성)

  • spatial locality (공간 지역성)
    • 현재 접근한 메모리 위치와 인접한 메모리 위치들이 가까운 미래에 접근될 가능성이 큼
    • 배열을 순차적으로 접근하거나, 구조체의 멤버들에 연속적으로 접근하는 경우
  • temporal locality (시간 지역성)
    • 최근에 접근했던 메모리 위치가 가까운 미래에 다시 접근될 가능성이 높다는 특성
    • 반복문의 루프 변수, 자주 호출되는 함수의 지역변수들
let spatial = [1,2,3];
let temporal = 0;

for (int i=0; i<3; i++) {
temporal = temporal + spatial[i]
}

가장 최근, 가까운 데이터를 저장

Cache Eviction Policies

Cache Expiration은 시간 기반으로 자동 제거하는데 반해 Cache Eviction은 공간 부족으로 강제 제거

  • FIFO(First in First Out)
    • 가장 먼저 들어간 캐시를 교체
    • Queue
  • LFU(Least Frequently Used)
    • 사용 횟수가 가장 적은 캐시를 교체
  • LRU(Least Recently Used)
    • 가장 오랫동안 사용되지 않은 것 교체
    • Doubly LinkedList

Cache Stampede

캐시 미스가 동시에 대량 발생했을 때 시스템에 과부하가 걸리는 현상

  • 타임 이벤트시 GET /events/{eventNo} , GET /products/{productNo} 부하 발생
  • 캐시 미스에 따른 캐시 갱신으로 인하여 모든 요청이 DB로 몰림(중복 리드)
  • 캐시 갱신을 위해 여러 서버에서 캐시 데이터 저장(중복 저장)

최근 발생한 Cache Stampede를 극복하기 위하여 아래와 같이 해결함

  1. 캐시 만료 시간은 1시간 설정
  2. 타임 이벤트 쇼핑몰일 경우 value값에 만료시간을 두고 어플리케이션에서 체크
  3. 요청에 대한 응답을 바로 주고 kafka로 캐시 갱신 토픽 발행
  4. reactive kafka를 사용하여 예상 갱신시간 만큼 윈도우 처리하여 중복 제거
        kafkaReceiver.receive()
.map(this::extractMessage)
.window(Duration.ofMinutes(1)) // 1분 윈도우
.flatMap(window ->
window.distinct(Message::getId) // 윈도우 내 중복 제거
.doOnNext(this::processMessage)
)
.subscribe();

용어

  • Cache Hit : 캐시에 데이터가 존재할 경우
  • Cache Miss : 캐시에 데이터가 존재하지 않을 경우
  • Cache Miss Penalty : Miss시 메인메모리에서 조회, 캐시 업데이트
  • Cache hit ratio : 캐시 히트 횟수 / (캐시 히트 횟수 + 캐시 미스 횟수)
  • Cache Invalidate : 원본이 변경되었을 경우 무효화
  • Cache Flush : clean + invalidate
  • Cache Expiration : 일정 시간이 지난 후 캐시에서 항목을 제거함. 오래된 데이터를 피하기 위한 전략
  • Cache Eviction : 새 항목을 위한 공간을 확보하기 위해 캐시에서 항목을 제거. 용량이 부족한 경우
  • Prefetch : CPU가 앞으로 사용할 것으로 예상되는 데이터를 미리 가져다 놓는다.
  • Hit Latency : 데이터를 찾아서 반환하는 데 걸리는 시간

Cache Strategies

Read Strategies

Cache Aside

https://i.imgur.com/SrrxstT.png

  • read가 많을 경우
  • 원본 스키마 != 캐시 스키마
  • miss시 응답 지연 발생
  • 동기화 문제
  • 캐시가 장애여도 전체 장애로 전파 X
  • 대부분 Redis를 이용하여 Cache Aside전략

Read Through

https://i.imgur.com/n5fG3BK.png

  • read가 많을 경우.
  • 원본 스키마 == 캐시 스키마
  • 최초 요청시 반드시 cache miss
  • origin size == cache size
  • CDN, reverse proxy

Write Strategies

Write Around

https://i.imgur.com/pC1x7v3.png

  • db 먼저 기록
  • 읽은 데이터만 캐시 저장
  • Read Through, Cache-Aside와 결합하여 사용
  • 한번 쓰고 가끔 읽는 경우

Write Back

https://i.imgur.com/QsOk2xO.png

  • 캐시에 먼저 기록, 지연후 db 저장
  • write가 많을 경우 유리
  • Read-Through와 결합 -> 최근 저장, 엑세스 된 데이터를 항상 캐시에서 사용
  • db 쓰기 비용 감소
  • 캐시 장애시 데이터 영구 소실

Write Through

https://i.imgur.com/Js5x9lD.png

  • Read Through 반대
  • db 저장과 동시에 cache 저장
  • Read Through와 Write-Through 같이 적용하면 read캐시 이점과 데이터 일관성 보장
  • 캐시 size == db size
  • 쓰기 지연 증가

캐시 적용시 고려사항

  • Capacity (용량)
    • Count-based : 엔트리 개수 제한
    • Size-based : 메모리 사용량 제한
    • Weight-based : 사용자 정의 가중치 기반
  • Hit Rate (캐시 적중률)
    • 적절한 TTL 조절
    • 워밍업 전략
    • 프리패칭 구현
  • Read-Write Strategies
    • 요구사항에 알맞는 읽기, 쓰기 전략 플랜이 필요
  • Coherence (일관성)
    • Strong Consistency: 모든 읽기에서 최신 데이터 보장
    • Eventual Consistency: 최종적으로 일관성 보장
    • Weak Consistency: 일관성 보장 없음
  • Expiration (만료시간)
  • Eviction (교체정책)
    • LRU, LFU, FIFO, TTL

Application Cache

Local Cache

https://i.imgur.com/5JgEB5b.png

  • 서버마다 캐시를 따로 저장한다.
  • 다른 서버의 캐시를 참조하기 어렵다.
  • 서버 내에서 작동하기 때문에 속도가 빠르다.
  • 로컬 서버 장비 자원 활용(limit)
  • 캐시 데이터가 변경시 일관성 문제
  • clustering, replication
    • scale out할수록 비용 증가

Global Cache

https://i.imgur.com/ZaUMAZI.png

  • 여러 서버에서 캐시 서버에 접근하여 참조 할 수 있다.
  • 별도의 캐시 서버를 이용하기 때문에 서버 간 데이터 공유가 쉽다.
  • 네트워크 트래픽 발생, 로컬 캐시보다는 느리다.
  • 데이터를 분산하여 저장 할 수 있다.
    • Replication: 두 개의 이상의 DBMS 시스템을 Mater / Slave 로 나눠서 동일한 데이터를 저장하는 방식
    • Sharding: 같은 테이블 스키마를 가진 데이터를 다수의 데이터베이스에 분산하여 저장하는 방법
  • 캐시에 저장된 데이터가 변경되는 경우 추가적인 작업 불필요
  • Scale-out 할수록, Cache 데이터 크기가 커질 수록 효율이 좋다

Distributed Cache

https://i.imgur.com/P1rsQRp.png

  • 캐시 사이즈, 네트워크 용량이 글로벌 캐시 용량을 넘을 경우 -> Sharding, Redis Cluster

Buffer VS Cache

  • 속도차이로 인해 고속의 장치의 기다림을 줄여준다는 공통점이 있어 헷갈릴 수 있다.
  • 캐시는 조회 후 삭제하지 않지만 버퍼는 한번 꺼내오면 삭제한다. 버퍼는 캐시에 저장하는 데이터보다 용량이 훨씬 큰 경우가 많다.
  • 버퍼의 대표적인 예는 프린트 이다. 인쇄를 하면 프린트 버퍼에 넣고 pc는 다른일을 할수 있다. 프린터는 버퍼를 통하여 인쇄를 한다.
  • 버퍼는 캐시보다 일반적으로 용량이 크며, 캐시와 달리 데이터를 저장할 수 없고, 응답에 대한 요청을 저속의 장치에서 출력할 때, 고속의 장치가 저속의 장치로 인해 정지되는것을 막아준다.

함수형 프로그래밍 & 패러다임

· 6 min read
Haekyu Cho
Software Engineer

클로저나 하스켈같은 함수형 언어들의 어렵고 복잡한 개념, 문법 설명이 아닌 함수형 패러다임을 자바스크립트 코드로 배워보는 시간

OOP 특징

  • 객체지향 프로그래밍은 상태(데이터), 메소드(함수)로 구현.
  • 5대원칙 : 단일책임, 개방폐쇄, 리스코브 치환, 인터페이스 분리, 의존성 역전
  • 4개 특징 : 캡슐화, 상속, 추상화, 다형성
  • 장점 : 재사용성, 유지보수
  • 단점 : 처리시간, 설계시 많은 고민+시간
// 객체 지향, print함수는 맴버변수의 상태에 따라서 값이 달라진다.
(() => {
class Test {
constructor(zero = 0) {
this.zero = zero;
}

print(x) {
console.log(`항상 x는 ${x}이고 zero는 ${this.zero}이여야 한다.`);
}
}

const test = new Test(0);
test.print(10); // zero 0
test.zero = 10;
test.print(10); // zero 10
})();

FP 특징

  • 함수지향 프로그래밍은 상태 공유 X
  • 함수를 call할 경우 타이밍과 순서는 결과를 변경하지 않는다.
  • no side effect : 부수효과가 없다.
  • pure function : 입력이 같으면 결과도 같다.( f(x)=y), 함수 내부에서 함수 외부에 값을 바꾸거나 임의의 타 객체를 생성하지 않는다.
  • idempotency : 멱등성

Pure Function

(() => {
const name = "DJ";
const hello = () => console.log(`I'm ${name}`);

const pureHello = (name) => `I'm ${name}`;

// non-pure function
hello();

// pure function
console.log(pureHello(name));

// 여기서 console이 내장 함수가 아니라 shopby.utils.xx 함수라면 결합도 차이는 어떻게 될까?
// hello함수와 shopby.utils.xx는 항상 결합되어 있으며 만약 hello함수 내부에 여러개의 외부 함수가 있다면 복잡도(=결합도)는 최소 선형으로 증가. 근데 외부 함수 안에 다른 외부함수가 있다면? 제곱으로 증가..

// pureHello를 살펴보면 외부와 단절되어있고 상태를 변경하지 않으며 그 자체로 immutable(불변)하며 여러곳에서 호출되더라도 리펙토링도 쉽고 결합도 역시 0이다.
})();

Higher-order Function

함수 자체를 파라미터(예 : callback)로 전달 또는 리턴이 함수자체, 대표적으로 map, filter, reduce, flatmap등등

// 리턴이 함수일경우의 예
(() => {
const add = (salary) => (name) => `${name}님 연봉 ${salary}만큼 올려주세요.`;
const func = add(3000);

// 결과 : xxx님 연봉 3000만큼 올려주세요.
console.log(func("xxx"));
})();

Non-iterable

for, while대신 high order function을 사용한다. (예 : map, reduce, flatmap, join등)

immutable

불변

(() => {
const mutable = function () {
const inputs = [`X`, `X`, `O`, `X`, `X`];

// 명령형 (Imperative)
for (let i = 0; i < inputs.length; i += 1) {
if (inputs[i] === "O") {
inputs[i] = `X`;
}
}

return inputs;
};

console.log(mutable()); // 결과 [`X`, `X`, `X`, `X`, `X`]
})();
(() => {
const immutable = function () {
const inputs = [`X`, `X`, `O`, `X`, `X`];

// 선언형 (Declarative)
const newInputs = inputs.map((input) => (input === "O" ? "X" : input));

return newInputs;
};

console.log(immutable()); // 결과 [`X`, `X`, `X`, `X`, `X`]
})();

Declarative

(() => {
const products = [
{
productNo: 1,
productName: "명품 삼겹살",
options: [
{ optionNo: 11, optionName: "1키로", display: true },
{ optionNo: 12, optionName: "2키로", display: true },
],
},
{
productNo: 2,
productName: "명품 한우",
options: [
{ optionNo: 21, optionName: "1키로", display: true },
{ optionNo: 22, optionName: "2키로", display: false },
{ optionNo: 23, optionName: "3키로", display: true },
],
},
{
productNo: 3,
productName: "명품 토종닭",
options: [
{ optionNo: 31, optionName: "1키로", display: true },
{ optionNo: 32, optionName: "2키로", display: false },
],
},
];

// 화면에서는 옵션 단위로 노출, display는 true여야한다.
// 예: 상품번호, 상품명, 옵션번호, 옵션명
// Imperative
const results = [];
for (let p = 0; p < products.length; p += 1) {
const product = products[p];

for (let o = 0; o < product.options.length; o += 1) {
const option = product.options[o];

if (option.display) {
results.push({
productNo: product.productNo,
productName: product.productName,
optionNo: option.optionNo,
optionName: option.optionName,
});
}
}
}

console.log(results);

// Declarative
const results2 = products.flatMap((product) =>
product.options
.filter((option) => option.display)
.map((option) => ({
productNo: product.productNo,
productName: product.productName,
optionNo: option.optionNo,
optionName: option.optionName,
}))
);

console.log(results2);
})();

1 2

// 또다른예
(() => {
const x = [0, 5, 0, 1, 9, 1, 5, 6, 7, 2, 3, 1, 1, 1, 2, 0, 9, 2, 3, 4, 1, 9];
// 0은 제거한후 홀수를 제거하고 2를 곱한 배열의 합을 구하시오.

const result = x
.filter(input => input !== 0) // 0이 아닌 결과를 반환
.filter(input => input % 2 === 0) // 짝수 반환
.map(input => input \* 2) // 2를 곱한 결과를 반환
.reduce((prev, cur) => prev + cur); // 전체 합을 구함

console.log(result);
})();

// 명령형으로 만든 Shopby JS코드
const termsList = shopby.api.common.getTermsList({
termsTypes: standardTermAgreements,
});
this.data.agreementList = Object.keys(termsList).map((termKey) => {
if (termsList[termKey].used) {
const key = termKey.toUpperCase();
const [label, required] = termsTitle[key];
return { ...termsList[termKey], label, required, key };
}
});

//선언형
this.data.agreementList = shopby.api.common
.getTermsList({ termsTypes: standardTermAgreements })
.filter((term) => term.used)
.map((term) => ({ ...term, label, required, key }));

Persistent Data Structures

상태 변화가 필요할때는 새로운 상태를 반환, 이전 상태는 유지

(() => {
const _closer = new Map();

const persistent = (inputs) => {
if (_closer.has(inputs)) {
return _closer.get(inputs);
}

// 새로운 객체
const result = inputs.map((input) => (input === "O" ? "X" : input));
_closer.set(inputs, result);

return result;
};

const inputs = [`X`, `X`, `O`, `X`, `X`];

console.log(persistent(inputs) === persistent(inputs)); // true
})();

currying

함수에 인자를 하나씩 적용해 나가고 필요한 인자가 채워지면 함수를 실행

(() => {
const _curring = (fn) => (a) => (b) => fn(a, b);
const substract = _curring((a, b) => a - b);

console.log(substract(10)(5)); // 10 - 5 = 5
})();

인자를 함수로 받고, 실행하는 즉시 함수를 리턴한다.

closure

함수가 속한 렉시컬 스코프를 기억하여 함수가 렉시컬 스코프 밖에서 실행될 때에도 이 스코프에 접근할 수 있게 하는 기능

(() => {
let say = "HI";

const log = () => console.log(say);

const log2 = () => {
let say = "Hello";
log();
};

log2(); // HI
})();

렉시컬 스코프 : 함수가 선언 될때 스코프 생성

Idempotent (멱등성)

같은 연산을 여러 번 적용해도 결과가 변하지 않는 성질

// 배열 정규화 - 멱등성을 가짐
const normalizeArray = (arr) =>
arr
.filter((x) => x != null) // null, undefined 제거
.map((x) => String(x).trim()) // 문자열로 변환 후 공백 제거
.filter((x) => x !== "") // 빈 문자열 제거
.map((x) => x.toLowerCase()) // 소문자 변환
.sort(); // 정렬

const data = [null, " Hello ", "WORLD", "", undefined, "hello", "world"];

const result1 = normalizeArray(data);
console.log(result1); // ['hello', 'world']

const result2 = normalizeArray(result1);
console.log(result2); // ['hello', 'world'] (동일한 결과)

// f(f(x)) = f(x)
console.log(JSON.stringify(result1) === JSON.stringify(result2)); // true

Serverless란? (FaaS)

aws lambda, cloud functions, azure functions등의 Function as a Service 상품을 이용하여 빠르게 기능을 구현, 배포, 관리

특징

  • 개발자가 서버를 관리할 필요 없이 application을 빌드하고 실행할 수 있도록 하는 cloud native 개발 모델 : NoOps
  • 서버가 없는게 아니라 존재 하지만 개발자가 신경쓸 필요가 없다
  • 개발자는 코드를 작성하고 컨테이너에 패키징만 하면 끝
  • 즉 오토스케일링 & 서버 프로비저닝, 배포, 모니터링등에 신경쓸 필요가 없음 (Automatic Scaling, Built-in Fault tolerance)
  • 배포 후에는 어딘가에 내가 작성한 코드가 올라가고 이벤트 기반으로 실행되며 실행한 만큼 미터링됨
  • iaas상품보다 가격이 매우 저렴

serverless

FaaS

  • Function as a Service
  • stateless 컨테이너에서 실행되는 이벤트 기반 컴퓨팅 실행 모델
  • serverless computing 구현하는 방식. 개발자는 비지니스 로직에 집중, faas가 컨테이너에서 실행
  • 서버리스 패러다임이 인기 (serverless micro services, serverless container)

이미지

개발 시나리오

  1. 개발자는 function을 작성한다.
  2. function을 faas에 올린다. (git push한다)
  3. 트리거에 의하여 function이 실행된다.

장점

  • Productivity, Stability, reliability, scalability, flexibility, Cost Effective
  • 모든 프로그래밍 언어로 작성가능(polyglot) : 컨테이너를 올리는 개념이라 극단적으로 표준 입력, 출력으로도 가능함
  • kafka consumer와 같이 이벤트가 발생되면 구독하고 있는 서비스로 메세지를 push
  • 이벤트 스펙은 cloudevent(CNCF에서 정의)

image.png

단점

  • cold start : JVM의 높은 시작 지연으로 인하여 graalVM와 같은 네이티브 기술이 발전 -> Provisioned Concurrency image.png
  • 각 함수에서 사용할수 있는 자원이 제한됨
  • stateless : 전역변수 개념 X
  • 응답이 길거나 예외사항이 많을경우 제약
  • 클라우드 벤더 락인

lock-in

의견

  • 기존 프로그래밍의 패러다임을 바꾸자 -> 함수형, 선언적, 비동기, 이벤트 드리븐
  • 기존 아키텍처의 패러다임을 바꾸자 -> cloud native

참고