Coroutine Dispatcher 분리
· 5 min read

ThreadPool을 분리해야 한다. 왜? 기존에는 Dispatchers.IO를 활용해 IO 작업을 처리하고 있었으나, 아래와 같은 문제가 발생하면서 ThreadPool을 용도별로 커스텀하여 분리하는 방향으로 개선
ThreadPool을 분리해야 한다. 왜? 기존에는 Dispatchers.IO를 활용해 IO 작업을 처리하고 있었으나, 아래와 같은 문제가 발생하면서 ThreadPool을 용도별로 커스텀하여 분리하는 방향으로 개선
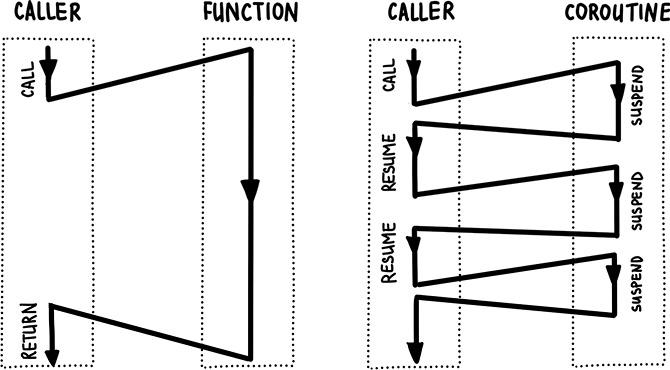
⇒ 같은 scope내에서 비동기적인 실행 (= caller) 코드로 예시를 들면
@Test
fun `코루틴`() {
    runBlocking {
    	launch {
            delay(1000L)
            println("World!")
        }
        println("Hello,")
    }
}
//결과
Hello, World!
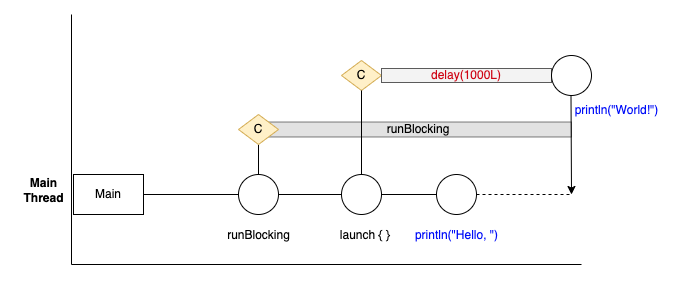
runBlocking 으로 감싸여진 launch{} 와 println("Hello, ") 는 같은 scope에 있다.launch로 생성된 코루틴은 비동기 실행이 가능
launch가 실행되고 내부에서delay(1000L)가 걸리면 코루틴이므로 해당 블록을 빠져나와 println("Hello, ")를 실행한다.println("World!") 를 실행한다.-> 코루틴인 launch{} 는 블록이 실행 중에도 같은 스코프 내에서 다른것들과 협력한다!
코루틴은 기본적으로 세가지로 구성되어있다.
CoroutineScope, GlobalScope , ..Dispatcher.IO, Dispatcher.Main, Dispatcher.Default, ...job과 Dispatcher
async, launch, runBlockingCoroutineScope에서 코루틴이 생성되어야만 비동기적인 동작을 한다. await() 메서드가 수행되면 코루틴의 결과가 반환되기까지 기다림 runBlocking은 현재의 스레드를 점유한다라는것이다.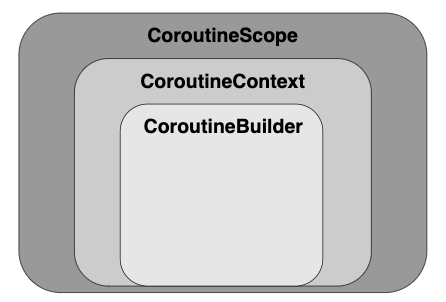
CoroutineScope(Dispatchers.IO).launch { } 이런식으로 사용launch { } 이렇게 더 많이 사용한다.
세가지 기본 구성에 추가로 dispatcher와 suspend fun, withContext에 대해 설명
종류는 기본적으로 네가지가 있다.
#### Dispatcher.Default
sysctl -n hw.ncpu
# 결과
8
repeat(50) {
CoroutineScope(Dispatchers.Default).launch {
println(Thread.currentThread().name)
}
}```
#### `Dispatcher.IO`
- **Default Dispatcher와 스레드풀을 공유**
- 필요에 따라 스레드를 더 생성하거나 줄일수 있다. (최대 64개)
- 이름에 맞게 주로 **DB, 네트워크, 파일 관련 작업에 적합**
- 위의 방법과 동일하게 thread를 출력해보면 **core의 개수보다 많은것**을 확인할수있다.
- 그 이유는 대기시간이 긴 네트워크 작업의 경우 **더 많은 스레드를 이용해 병렬처리**하는것이 더 효율적이기 때문이다.
#### 프로젝트에 적용시에는 기본적으로 제공하는 Dispatcher를 사용하기보다 각 기능에 맞는 Dispatcher를 생성해 사용하는것이 좋다.
예시)
, WebClient 통신시..)
- suspend fun 만으로는 비동기 처리 X
- suspend fun은 코루틴 내부에 있어야하고, 그 코루틴은 해당 스코프에서 비동기 처리를함
- 비동기에서 중요한점은 **해당 스코프에서 코루틴을 생성**해야한다는 것이다.
- coroutine의 suspend 함수는 thread를 block 하지않는다.
<br/>
헷갈렸던 부분을 예시로 들어보면
<br/>
``` kotlin
@Test
fun `동기`() {
runBlocking {
val time = measureTimeMillis {
val one = first()
println("between")
val two = second()
println("the answer is ${one + two}")
}
println("Completed in $time ms")
}
}
suspend fun first(): Int {
println("first")
delay(1000L)
println("first end")
return 13
}
suspend fun second(): Int {
println("second")
delay(1000L)
println("second end")
return 29
}
나의 착각
runBlocking)에서 suspend fun 을 호출하므로 비동기적으로 실행될것으로 착각했다.runBlocking 밖에 없다.
first
first end
between
second
second end
the answer is 42
Completed in 2021 ms //비동기 처리 안됨
**코루틴을 생성하지않고 위와같은 방식으로 사용시 비동기 동작이 안된다는것을 알수있다. **
async로 묶는다.async { first() }, println("between"), async { second() } 가 있고
aync 로 만들어진 코루틴은 협력하는 함수 이므로 특정 시점(delay)에 일시정지를 하고 코루틴을 빠져나와 같은 스코프의 다른 함수들과 협력할수있다.@Test
fun `비동기`() {
runBlocking {
val time = System.currentTimeMillis()
val one = async { first() }
println("between")
val two = async { second() }
println("the answer is ${one.await() + two.await()}")
println("Completed in ${System.currentTimeMillis() - time} ms")
}
}
suspend fun first(): Int {
println("first")
delay(1000L)
println("first end")
return 13
}
suspend fun second(): Int {
println("second")
delay(1000L)
println("second end")
return 29
}
between
first
second
first end
second end
the answer is 42
Completed in 1018 ms // 비동기 처리
그림으로 나타내보면 아래와 같다.
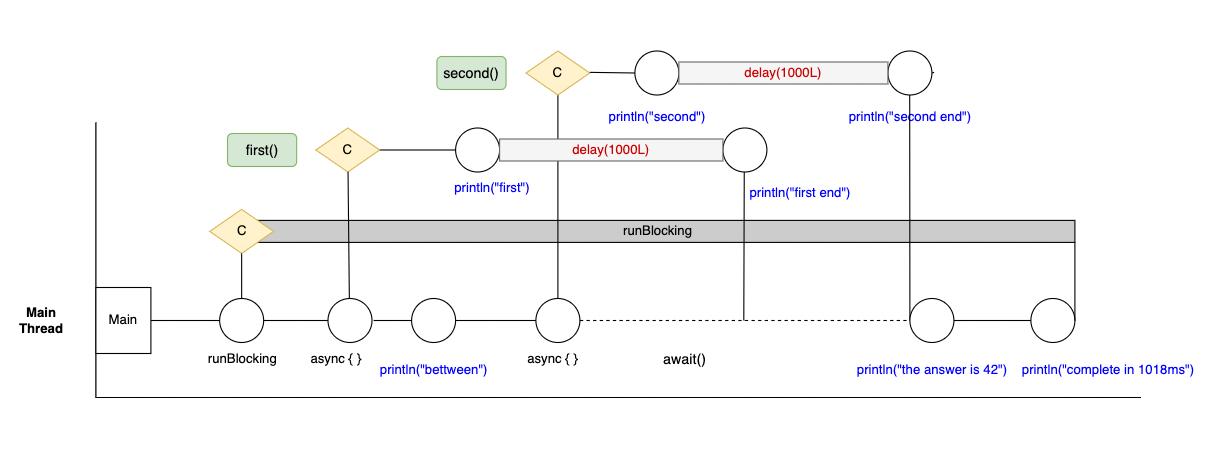
println("first") 보다 println("between") 이 먼저 출력된것은 async를 call 하기 때문이다.withContext는 블록의 마지막 줄 값을 반환한다.withContext의 블록이 끝나기전까지 해당 코루틴은 일시정지
coroutineScope와의 차이점은 withContext는 컨텍스트를 전달할수있다.
coroutineScope ≡ withContext(this.coroutineContext)주문 도메인에서 사용하고 있는transactionTemplate.executeWithContext {}를 살펴보자
이것은 withContext이므로 코루틴 빌더가 아니다. (처음엔 이것도 코루틴 빌더라 착각했다.)
트랜잭션을 만들고 그 동작을 설정한 context에서 한다 라는 의미이다.
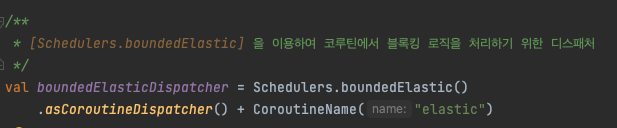
실제로 구현된 코드를 보면
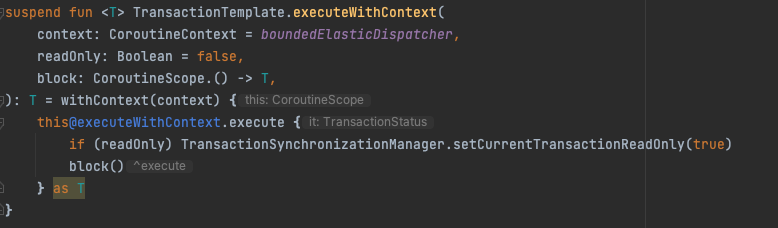
execute 하는 것을 볼수있다.boundedElasticDispatcher를 사용
첫 학습 시 코루틴에 대해 확실히 이해하기 어려웠는데 아래 자료를 많이 참고함 https://silica.io/understanding-kotlin-coroutines/5/
코루틴을 이해하기 위해 먼저 멀티 스레드가 아닌 단일 스레드에서 진행하면서 코루틴을 이해하고 이후 예시에서 멀티 스레드를 다루겠다.
(현재 스레드 의 출력하는 부분은 코드상 생략)
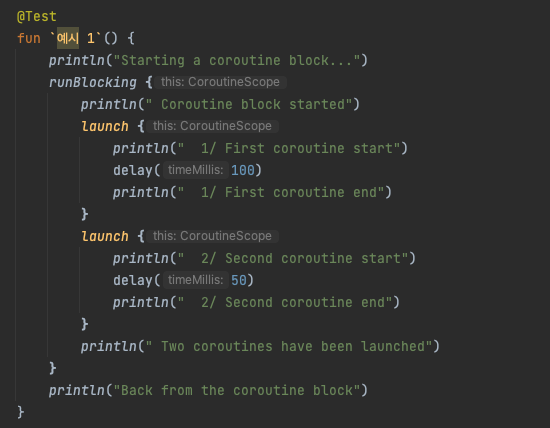
[Test worker]                Starting a coroutine block...    // [Thread 종류 @코루틴번호] 출력,
[Test worker @coroutine#1]   Coroutine block started          // 현재는 싱글 스레드에서 실행하므로 test worker에서만 실행
[Test worker @coroutine#1]   Two coroutines have been launched
[Test worker @coroutine#2]    1/ First coroutine start
[Test worker @coroutine#3]    2/ Second coroutine start
[Test worker @coroutine#3]    2/ Second coroutine end
[Test worker @coroutine#2]    1/ First coroutine end
[Test worker]                Back from the coroutine block
'Two coroutine have been launched' 가 1/ First 와 2/ Second 보다 왜 먼저 출력될까?

launch를 call을 한다.
println("Two coroutines have been launched") 가 먼저 실행된것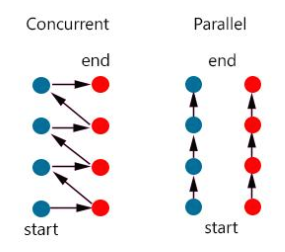
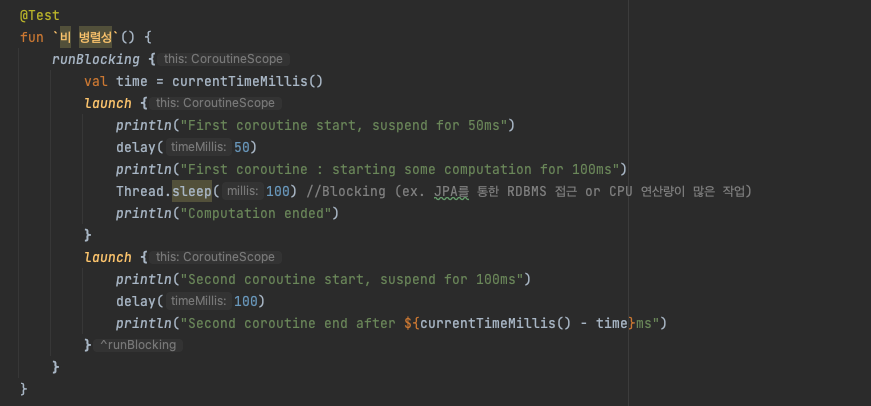
코드 예시
 결과
결과
First coroutine start, suspend for 50ms
Second coroutine start, suspend for 100ms
First coroutine : starting some computation for 100ms
Computation ended
Second coroutine end after 160ms // 100ms 가 아닌 160ms 가 소요됨
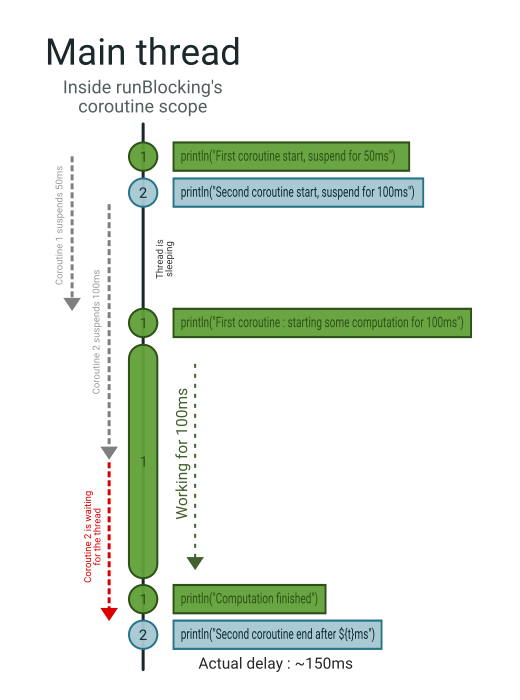
Thread.sleep(100) 으로 스레드를 독점함 (delay와 달리 thread가 blocking된다.)
Webclient 같은 non-Blocking 작업에 효과적이지만, Blocking 방식의 RDBMS 작업은 효과적이지 않다 라는 결론.멀티 스레딩 방식의 코루틴을 사용 해야한다.
Dispatcher를 이용하면 스레드를 변경할수있다.코드 예시
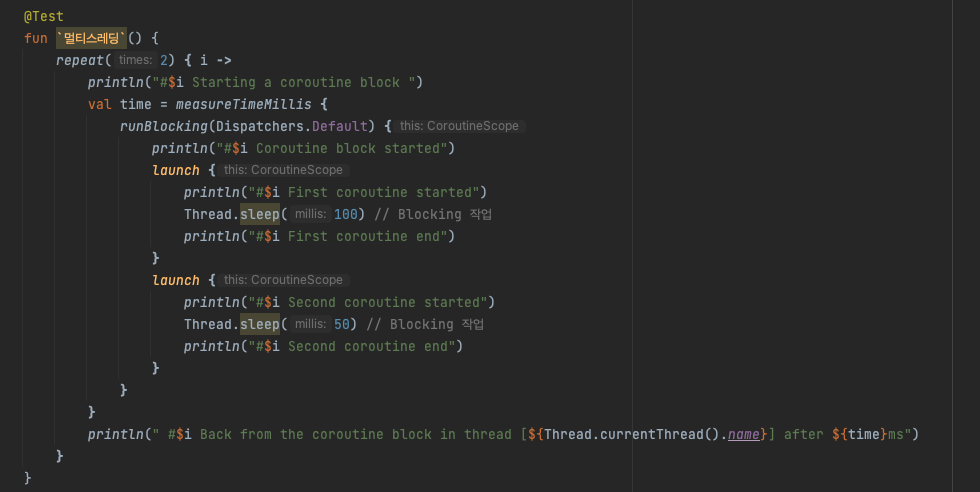
Dispatchers.Default : Default worker 스레드풀을 사용한다.
Test worker만을 사용해 단일 스레드로 비동기 처리를 했음================== 첫번째 ==================
[Test worker] #0 Starting a coroutine block
[DefaultDispatcher-worker-1 @coroutine#1] #0 Coroutine block started
[DefaultDispatcher-worker-2 @coroutine#2] #0 First coroutine started
[DefaultDispatcher-worker-3 @coroutine#3] #0 Second coroutine started
[DefaultDispatcher-worker-3 @coroutine#3] #0 Second coroutine end
[DefaultDispatcher-worker-2 @coroutine#2] #0 First coroutine end
[Test worker] #0 Back from the coroutine block in thread [Test worker] after 133ms // 150ms 보다 작음
================== 두번째 ==================
[Test worker] #1 Starting a coroutine block
[DefaultDispatcher-worker-2 @coroutine#4] #1 Coroutine block started
[DefaultDispatcher-worker-2 @coroutine#6] #1 Second coroutine started
[DefaultDispatcher-worker-1 @coroutine#5] #1 First coroutine started
[DefaultDispatcher-worker-2 @coroutine#6] #1 Second coroutine end
[DefaultDispatcher-worker-1 @coroutine#5] #1 First coroutine end
[Test worker] #1 Back from the coroutine block in thread [Test worker] after 106ms // 150ms 보다 작음
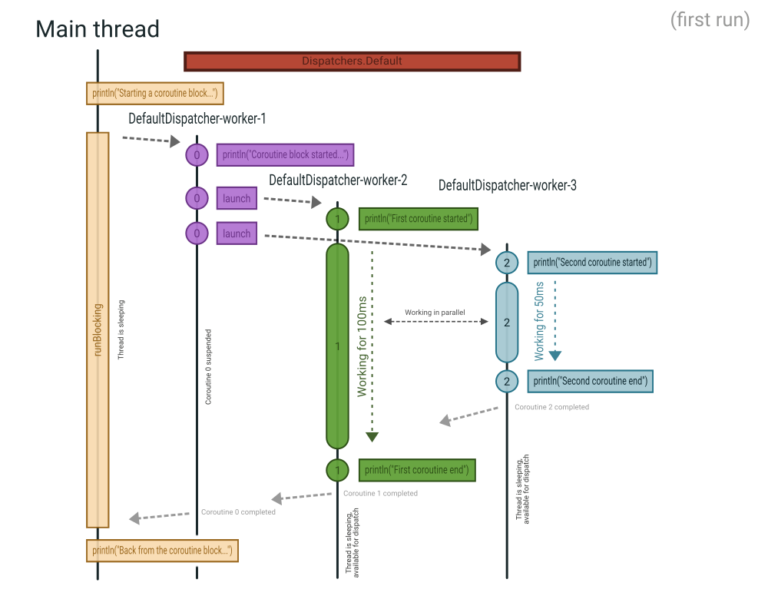
Thread.sleep을 총 100 + 50 = 150ms 를 했지만 실제 결과들은 그것보다 짧음
DefaultDispatcher를 이용해 다른 스레드들(worker-2, worker-3)에서 각각 100ms, 50ms 작업을 했기때문이다.defaultDispatcher-worker 스레드 풀을 생성 비용 때문코드 예제
 결과
결과
[Test worker]                               Starting a coroutine block
[DefaultDispatcher-worker-1 @coroutine#1]   Coroutine block

[DefaultDispatcher-worker-2 @coroutine#2]   First coroutine started
[DefaultDispatcher-worker-3 @coroutine#3]   Second coroutine started in thread
[DefaultDispatcher-worker-3 @coroutine#3]   Second coroutine end
[AccessThread @coroutine#4]                 Second coroutine reporting result=13 in Access Thread
[DefaultDispatcher-worker-2 @coroutine#2]   First coroutine end
[AccessThread @coroutine#5]                 First coroutine reporting result=29 in Access Thread

[Test worker]                               Back from the coroutine block
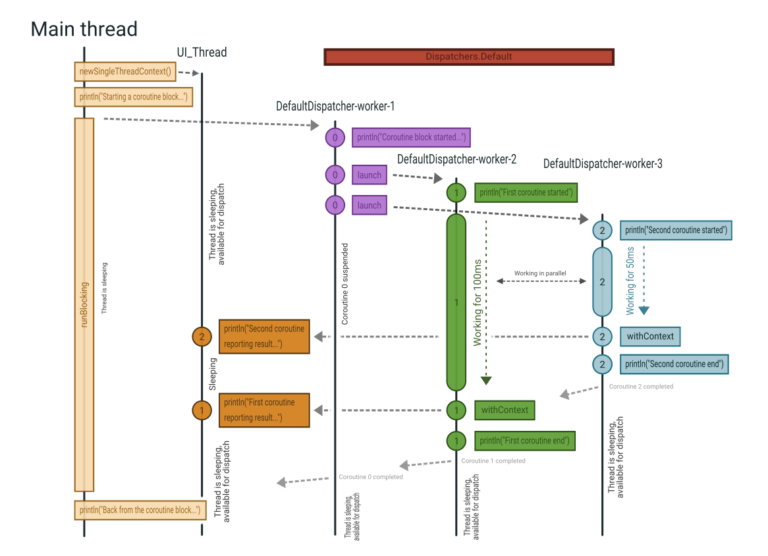
accessContext 라는 하나의 스레드에서 리소스에 접근한다.newSingleThreadContext() 만 사용하면된다.withContext를 사용하면 된다.
launch(accessContext) => withContext(accessContext)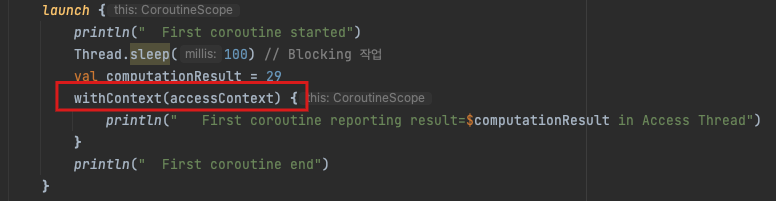
직접 그려본 다이어그램
